Google Search

Custom Search

Powered by...

Find us on Facebook

Showing posts with label HTPC. Show all posts

Wednesday, 6 March 2013

SoundGraph VF310 15c2:0036 Linux / XBMC

I have an OrigenAE M10 HTPC case which has a SoundGraph IR/VFD unit – Model: VF310 15c2:0036. This is the LCD display on the front of the HTPC case. Before I attempted to get the LCD display working under Linux Ubuntu 12.10 minimal and XBMC V12.0 Frodo, I had read several forum threads and it sounded very difficult to set this up under Linux especially with this particular model, however it turned out to be quite simple.

I already have the IR receiver working in MCE mode, I did have difficulties with this and was having issues with double presses / commands from the remote being sent to XBMC. I had installed LIRC initially and I think that and the inbuilt modules in the kernel for iMon where conflicting, in the end I uninstalled LIRC and only used the in kernel modules. I followed this user guide here and the “Do everything completely in-kernel”" option to get the MCE (Logitech Harmony) remote control working properly. You can see some comments I made on that thread here. I am not going to cover the setup of the remote control here as I had allot of problems with it.

Anyways I am looking at the LCD display today not the remote control setup. This is how I got it working. I also started a thread about it here on the XBMC forum.

To double check which VFD unit you have from terminal type

lsusb

Bus 002 Device 003: ID 15c2:0036 SoundGraph Inc. LC16M VFD Display/IR Receiver

1. From terminal I installed LCDProc

sudo apt-get update
sudo apt-get install lcdproc

I then read the relevant parts of the LCDProc user manual here.

2. Edit the LCDd.conf file located in /etc

cd /etc
sudo nano LCDd.conf

Scroll down to the [Server] section and change this line from:

Driver=curses

To:

Driver=imon

Note: There is also an imonlcd driver I tried this initially but I just got garbled text on the display.

Scroll a bit further down to the Welcome and Goodbye messages, change these to suit your requirements. These messages are displayed when the HTPC is turned on from shutdown and when it is shutting down.

# Hello message: each entry represents a display line; default: builtin
#Hello="  Welcome to"
#Hello="   LCDproc!"

# GoodBye message: each entry represents a display line; default: builtin
#GoodBye="Thanks for using"
#GoodBye="   LCDproc!"

Change this setting:

# If yes, the the serverscreen will be rotated as a usual info screen. If no,
# it will be a background screen, only visible when no other screens are
# active. The special value 'blank' is similar to no, but only a blank screen
# is displayed. [default: on; legal: on, off, blank]
#ServerScreen=on

To:

ServerScreen=blank

You need to remove the comment # in front of it to make the setting active.
I wanted to slow down the speed that the text scrolls across the LCD display, I tried changing this setting but it does not seem to do anything?

# set title scrolling speed [default: 10; legal: 0-10]
#TitleSpeed=10

I change it to:

TitleSpeed=1

Save and exit the LCDd.conf file to do that press Ctrl+X on the keyboard then Y then hit enter.

3. In the XBMC settings in System enable the option for LCD/VFD

4. Edit the LCD.xml fie. There is an LCD.xml file in your userdata folder, you can customise and change
this file if required? You can read more about the LCD.xml file here.

I did make one change to the file and that was:

From this:

<navigation>
      <line>$INFO[System.CurrentWindow]</line>
      <line>$INFO[System.CurrentControl]</line>
      <line>Freemem: $INFO[System.FreeMemory]</line>
      <line>$INFO[System.ScreenWidth]x$INFO[System.ScreenHeight] $INFO[System.ScreenMode]</line>
   </navigation>


To this:

<navigation>
      <line>$INFO[System.CurrentWindow]</line>
      <line>$INFO[System.CurrentControl]</line>
      <line>Transport Controls</line>
   </navigation>


Because when I navigated in the XBMC GUI over the transport controls like Play / Pause / Stop etc the second line on the display would output my free memory like this: FREEMEM: 3382MB I don’t know why it does not display the name of the current transport control you are on? So I changed it to simply read “Transport Controls”


5. Reboot and your LCD display should now be working!

This is what gets displayed when nothing is happening

XBMC Running….
Current date and time..

You can change this in the LCD.xml file in the general section.

DSCN1175

When I navigate around the XBMC GUI the second line on the display shows what Menu item I am currently on?

DSCN1176

DSCN1187

Here I am playing a music track Depeche Mode – Personal Jesus, the track play and remaining times are also shown. You can change what gets displayed for music playback in the music section of the LCD.xml file.

DSCN1181

Not very clear in the photo, but I am currently highlighting one of the transport controls in the XBMC GUI and “Transport Controls” now scrolls across the screen whenever I do this.

DSCN1183

Here I am now in my movie library in XBMC and as I navigate over the different movie titles, if I pause on a title it displays that titles name on the LCD display.

DSCN1185

Here I am playing a movie – E.T. The Extra-Terrestrial

DSCN1189

This is a bit funky, when in the System settings area and also when I am on some of the other system type menus it looks like this

DSCN1186

Summary

The only other slight issue is that when I shutdown the HTPC (S5 Shutdown) the Goodbye message stays on the screen and the LCD display does not turn off. However if I put the HTPC in to S3 Sleep mode instead then the LCD display is turned off and the Goodbye message is not displayed. Also the Welcome message does not stay on the display long enough for my liking.

Overall I am very pleased that the LCD display is now working as I thought it would be a complete nightmare to setup and actually it was relatively simple. I wish I could say the same for setting up the IR MCE remote control, as that was a nightmare!

Please keep in mind I do not have LIRC installed, if you are using LIRC for your remote control this may or may not work ?


Phaze1 Digital

Tuesday, 5 February 2013

OrigenAE M10 Mini-ITX HTPC Build

Quick post today looking at a new HTPC Build I just did. I plan to install Ubuntu Minimal and XBMC !

HTPC Case – OrigenAE M10
Motherboard - Intel DH67CF
CPU – Intel 2nd Generation Core i3-2100
Aftermarket Cooler – Akasa K25
Zalman Fan Mate 2
RAM - Corsair 4GB DDR3
SSD – Crucial 64GB M4
Blu-ray ROM – Sony BC-5650H (On its way from Hong Kong)

OrigenAE M10 case – this particular case has a right of centre eject button for the optical drive, I’ve seen some of these cases where the button is on the left, so make sure you get the right slot loading optical drive which is easier said than done. I can’t seem to source any new slot loading Blu-ray drives in the UK, they are either second hand or refurbished. So I have a new one coming from Hong Kong thanks to my Chinese friend I know who is sending me one.

It also has the VF310 SoundGraph VFD/IR display, which I have read is extremely difficult to get working under Linux, unlike the VF210 version of it. Not looking forward to that!

DSCN1089

DSCN1090

I read that the rear intake fan was a little noisy running at full speed, so I bought a Zalman Fan Mate 2 to I can slow down the speed of this fan and make it quieter! If I still lived in a hot country I wouldn’t do this.

DSCN1092

DSCN1095

DSCN1096

There is no doubt that the OrigenAE M10 is the original beautiful looking Mini-ITX HTPC case and I have always fancied having one, but the internal layout is a bit of a let down and could have been done better, you can only install one 2.5” SSD drive and it screws to the side of the case as shown in the next three pictures.

DSCN1093

Outside of the case (Lid off) looking in at the SSD.

DSCN1094

DSCN1106

Cases some in Black or Silver.

DSCN1097

PICO PSU and External Power Brick are supplied with the case.

DSCN1098

External power brick next to a Harmony remote.

DSCN1107

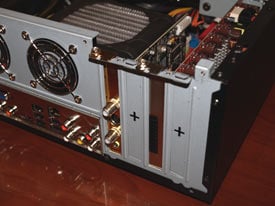
Rear connections and ports on the Intel motherboard, you can also install a low profile PCI-E card.

DSCN1101

Installing the Mini-ITX Motherboard

DSCN1100

I’m sure the stock CPU coolers are decent these days but old habits die hard, so I opted for an Aftermarket Akasa low profile cooler.

DSCN1104

It spins quite slowly and I can hardly hear it. I am only using the Zalman Fan Mate 2 on the rear chassis fan and they recommend you be careful if using them on a CPU fan for obvious reasons if its set too low and not doing its job properly cooling the chip. 

You can see I have the single Corsair 4GB RAM chip installed as well now.

DSCN1105

This is interesting, don't think I have seen this before, the circuit board you can see in the below picture is for the SoundGraph VRD, there is a switch on it, the default position is SoundGraph, the other says Philips. There is also a pin connector which says Philips IR, I am guessing if you don’t want to use the SoundGraph IR receiver you can set it to Philips and use a standard internal IR receiver board. Not sure where the IR window is, presuming its built in to the LCD Display some where.

DSCN1103

DSCN1108

Optical drive bay now installed, but I have no optical drive at the moment to put in to it. If you look at the bottom right you can see the circuit board for the front power switch arrangement.

DSCN1110

DSCN1111

I had to put on the Power LED cable the other way round as to what is shown in the Intel motherboard diagram, reversed the pins – / + etc.

DSCN1113

After realising my TV was on the wrong HDMI input and a brief panic, I was then able to see the boot screens and get in to the BIOS.

DSCN1109

Quick Summary

Very nice, good build quality and great looking Mini-ITX HTPC case. If you want this style of chassis with an LCD display then this is probably the one to go for, budget allowing. If your not bothered about an LCD I would recommend a fanless solution like the Streacom FC8. The OrigenAE M10 came with one of those daft iMon Pad remotes, would like to see it shipped with a decent MCE remote. Internal design around the optical drive bay could be better, you are limited to what types of slot loading drives you can use, due to button position and mechanism and I think they could have made it so you could install two 2.5” hard drives.
Next I need to install an OS, I have decided to install Linux Ubuntu and XBMC with a view to migrating all my HTPC’s away from Windows 7 / MCE in the long term. Will let you know how that works out? As I am new to Linux so it could be a bit of a learning curve. So keep reading the blog to find out. Or leave a comment if you have recently moved away from MCE.

Wednesday, 22 July 2009

A look at the Luxa2 LM Series – HTPC Cases

Here we have two HTPC cases from Luxa2. On the bench today I have the LM 200 and LM 300 Pro models and the first thing you notice about these cases when viewing them in person is their size, they are massive and I mean big!

LM 300 Pro - Dimensions

image

Height:
203.5mm (8.01 inches) / food stand included: 218mm (8.58 inches)

Width:
460mm (18.11 inches)

Depth:
410mm (16.14 inches)

However they look like really expensive bits of kit. The finish is excellent in Aluminium and the build quality has an attention to detail.

They both have a IR/VFD display from Soundgraph with the usual Imon Pad remote control. There are some control buttons on the front of the case, however not all of which are really doing anything for me in Media Center at the moment, despite installing the latest Imon software, this is something I need to fix.

Volume Knob – Not currently working with Media Center

Start – Not currently working should take me to the Media Center start menu

Imedian – When pressing this button Media Center jumps between windowed and full screen mode

Menu – Does seem to do anything when pressed

App Exit - Does seem to do anything when pressed

The Up, Down, Left, Right arrows do work and I can navigate the Media Center menu’s also the Esc (Back) and Enter buttons are working.

There is a flip down panel on the front under the LCD display which hides the usual USB and card reader ports.

I love the way the optical drive cover slowly closes back up, after you have inserted a disk in to the optical drive.

One thing I don’t like about these chassis in that despite their large size you can only fit two 3.5” Hard disk drives. There is a simple metal shelf that runs inside the case and your two HDD’s and the Optical drive simply sit on top of this shelf. There are no drive bays and there is lots of wasted space inside the chassis that is not used, there is plenty of room to have 4 HDD’s but no provision has been made for doing so. This is the biggest problem with the Luxa2 IMHO.

Below are some photographs I took of these two models, click to enlarge.

DSCN3566 DSCN3567

DSCN3568 DSCN3569

DSCN3570 DSCN3572

DSCN3573 DSCN3574

DSCN3575

Overall a nice HTPC chassis, large in size but a little short on internal HDD bays.

Clubhouse Tags: Clubhouse”, Media Center”, Story”, HTPC CaseC Case”, Luxa2

Monday, 20 July 2009

A look at the Moneual 312 HTPC case

UPDATE: There is a fault with the IR boards on these cases and the triple tap text input on the remote control for Windows Media Center does not work.

This is my favourite HTPC case at the moment, the micro ATX Moneual 312.

It looks like a DVD player which is why I like it so much, it blends in very nicely with your exiting A/V equipment. It’s available in Black and Silver, I prefer the black myself. The case is made from aluminium and they are of good build quality.

T-BOX One

T-BOX One Silver

I haven’t needed to install the IMON software from SoundGraph on these cases which is always a good thing, The volume knob and IR receiver just work out of the box with Windows Vista. The drop down front panel hides an array of ports including:

Mic, Headphone, Firewire x 1, USB x 2, Card Reader – MS/Pro/Duo, SD/MMC, CF/Microdrive, SM.

Inside there is room for the micro ATX motherboard, DVD or Blu-ray optical drive and two 3.5” hard disk drives.

There can be an issue with the eject button for the optical drive not working correctly, if the drive bay is not lined up exactly. This is the only thing I think could be improved. Overall a nice product for the lower end HTPC build.

Spec of the machine in my photographs:

  • Motherboard:- Gigabye GA-MA78G-US2H Rev 1.0
  • Chipset:- AMD 780G
  • CPU:- AMD Athlon Dual Core 2.7 GHZ
  • GPU:- Onboard ATI Radeon HD 3200
  • Audio:- Realtek ALC889A 7.1-CH High Def
  • Ram:- 4GB
  • Hard Disk Drives:- Western Digital 500GB (OS) Seagate Barracuda 1.5TB (Data)
  • DVD Writer
  • PSU:- Cooler Master P/N RS-460-PCAR-A3 (312W)

IMG_0276 IMG_0277

IMG_0278 IMG_0279

IMG_0280

Clubhouse Tags: Clubhouse”, Media center”, story”, HTPC Case”, Moneual 312

Friday, 19 December 2008

Great video on You Tube - HTPC Build

I was bored looking around You Tube and stumbled on this video, some guy building his HTPC, not that interesting I hear you say?
The video is pretty cool I think and the thing I like the most about this video is the sound track he used which is a really cool track!
Think it's from the 1995 Hackers movie, take a look here.
Think I might just watch Hackers again, great film and have not seen it for a long time!

Friday, 12 December 2008

Guide to building a HD HTPC

If your current hardware knowledge and PC building skills are as bad as mine
which I very much doubt!

And when you built PC's on a regular basis, motherboards had
no USB ports and then when they did have USB ports no USB devices existed for two years, floppy disk drives were a must have feature and the latest
graphics cards where either Matrox or Diamond and if you had 128MB of RAM you
were lucky! That's what years of senior corporate I.T. management OEM buying power and
laziness gets you! Then this guide is going to be right up your street.

An extremely knowledgeable chap who goes by the name of Renethx over on the
AVS Forums has a fantastic guide for newbie's like me and seasoned PC builders alike.
Check it out here.
Warning there are 160 plus pages and it will make your head hurt if you read
too much, however the first 15 pages or so and for current specs page 85 onwards are the
essentials.

His HD HTPC build recommendations cover low end, mid range and high end, Intel / Intel, Intel / Nvidia, AMD / AMD and AMD / Nvidia chipsets, he
also covers building massive terabyte storage servers and home servers and high end workstations.

I think I'm gonna just choose one of this spec recommendations and build away when I have the spare cash that is!

Friday, 5 December 2008

AMD Maui HTPC - Video

I really like the look of this AMD HTPC and I really like the motherboard from MSI, it's a MSI 7411 and has the options for either a 5.1 amplified sound card, which you can connect directly to none powered passive speakers, so you would not need an AV reciever. Or a pre amp 7.1 add-in card. Take a look at the Video of the AMD HTPC here

"AMD's "Maui" home theater PC platform consists of a combination of AMD hardware and software. Systems built around the platform feature an energy efficient Phenom or Athlon processor, ATI Radeon graphics, ATI TV tuners, and AMD LIVE! software elements. The current foundation of the platform is MSI's somewhat unique Media Live DIVA 5.1 motherboard, which is based on the AMD 780M chipset, and includes a specialized Intersil D2 Ausio DAE-3 audio chip with an accompanying 5.1 channel amplifier, but a 3.1 / 7.1 pre-amplifier card is also an option."


Check out AVS Forum for the real low down on this motherboard.