Google Search

Custom Search

Powered by...

Find us on Facebook

Saturday 31 May 2014

XBMC OpenElec / Logitech Harmony / Micasaverde Vera integration - UPDATED!


When I was using Windows Media Center, I was able to program my Logitech Harmony universal remote controls to control my Z-wave lights and devices in Micasaverde Vera, I wrote about that back here. And also here for mControl.

Basically the idea is this – Program your Logitech Harmony to send keyboard shortcuts to your HTPC via IR or with the RF extender. Your HTPC in response then runs a script to send a http request to your home automation system to do something, like turn on some lights or control a device in your home. I still think its a brilliant idea and whilst using your HTPC you can turn your bog standard IR universal remote control  handset in to a Z-wave / Home Automation remote control handset !

Since I moved to OpenElec XBMC I have lost this feature until now! There are no other how-to or guides on the Internet that talk about this topic directly? Not that I have seen anyway's and as my Linux programming skills are not great, I have had to battle through and cobble it all together myself. If you are more proficient in Linux then you may well spot some ways of improving what I have done, so please feel free to leave your comments.

I have this working currently on only one of my HTPC’s this is an Intel based mini ITX board using the CIR header and an Inteset CIR receiver board. I am using OpenElec 4.0.3 Gotham.

The break through came when I discovered this thread here, which talks about enabling the mce_kbd IR protocol in Linux (MCE Keyboard). As without this the QWERTY keyboard shortcuts just don’t work and are not seen.

Here is an over view of the steps required and what I will be covering in this blog post.

1. Enable the mce_kbd IR protocol in Linux

2. Figure out what http commands you need to send to your Home Automation controller (Vera)

3. Create the script files XBMC will run to send the http request to the Home Automation controller

4. Create / Tweak the XBMC keyboard.xml keymap file to add support for your new keyboard shortcuts in XBMC

5. Program your Logitech Harmony remote with the new keyboard shortcuts (MCE IR Keyboard required)

6. Test, hope it works and if it does, sit back and think WOW nice one CW-KID!

OK before we start just a word about the Logitech Harmony software there are several devices / profiles in the database relating to MCE:

Windows Media Center SE
Windows Media Center (EU)
Media Center Extender
MCE Keyboard

Are just the ones I know about. I am using the “Windows Media Center SE” device.  When using the MCE Keyboard profile I had big problems with the command being sent multiple times over and over so I don’t recommend you use that profile.

Also there may be ways to do this without actually owning a MCE IR keyboard and using the pre-defined keyboard shortcuts in the Harmony MCE profiles. However I think if you have Logitech Harmony’s then you should have one of these MCE IR Keyboards. So you can teach your Harmony any keyboard shortcut combination you wish, so I recommend you just buy one if you haven’t got one.  This will also give you much greater scope for creating many new keyboard shortcuts such as Ctrl+Alt+A  to Ctrl+Alt+Z and many more etc


1. Enable the mce_kbd IR protocol in Linux

Until you do this your just pissing in the wind trying to send IR keyboard shortcuts, believe me I know. Use Putty to SSH in to your OpenElec PC, if you don’t know how to do this use Google.
enter this command:

echo +mce_kbd > /sys/class/rc/rc0/protocols

then type ir-keytable –v

If you are in luck you should see a line that says:
/sys/class/rc/rc0/protocols protocol mce_kbd (enabled)

image

This worked on one of my HTPC’s with the Inteset CIR receiver board but did not work on another HTPC which has an iMon VFD/IR I’m still investigating that issue. Can you help me here?

OK so now you need to add this command in to your OpenElec autostart.sh script file. If you haven’t got one follow the wiki here to create one.

This will ensure that this command is run each time you turn on your PC.

image

2. Figure out what http commands you need to send to your Home Automation controller

I am basing this on Micasaverde Vera as that is my Home Automation controller, however this should work for any HA controller that can accept HTTP commands. I know it will work with mControl for example and probably many others like HomeSeer.

If you see my previous blog post here I talk about how to figure out what the http commands are to control devices and scenes.
So I am just going to copy and paste from that previous post and tweak it a little bit to save myself some time.

Turning a Z-wave device on and off
Here is an example HTTP command which turns on my Lamp (Left) device in my living room. You need to know what your DeviceNum is?

curl "http://192.168.1.100:3480/data_request?id=lu_action&output_format=xml&DeviceNum=3&serviceId=urn:upnp-org:serviceId:SwitchPower1&action=SetTarget&newTargetValue=1"

There are two ways to work out the device number, you can go to the Vera UI in a browser find the device in question, click the spanner icon and then go to the settings tab. You can see that this Lamp (Left) device is ID 3 and DeviceNum=3 in the above HTTP string to turn on this device.

image

The second method of listing the ID numbers for all your devices and scenes in Vera is to use the URL below, which displays a page of XML with all the information in it. Change IP-Address for the internal IP address of your Vera box.
http://IP-Address/port_3480/data_request?id=lu_sdata&output_format=xml

This example HTTP command turns off the Lamp (Left) device:

curl "http://192.168.1.100:3480/data_request?id=lu_action&output_format=xml&DeviceNum=3&serviceId=urn:upnp-org:serviceId:SwitchPower1&action=SetTarget&newTargetValue=0"

Note:
SetTarget&newTargetValue=0 = OFF
SetTarget&newTargetValue=1 = ON

To test your Vera HTTP commands you can just run them in a browser and the Z-wave device should respond. Obviously you need to change the IP address 192.168.1.100 to the IP address of your own Vera unit.

Run a Vera scene

In this example we are going to look at a HTTP command to run a scene in Vera. Again first you need to know the scene number of the particular scene you would like to create your script file for. My scene is called “Lounge On” if I look at the scene in Vera I can see its number is = 1

image

Or if I look at the XML code from the URL I mentioned above, I can see its id=1

<scene active="0" name="Lounge On" id="1" room="1"/>

So now I know the ID number of the scene I want to create a script file for, I can use the HTTP command below, note I have the number 1 at the end: RunScene&SceneNum=1

If my scene had an ID of 5 I would change this to be RunScene&SceneNum=5 etc.

HTTP Command to run a Vera Scene:

curl "http://192.168.1.100:3480/data_request?id=lu_action&serviceId=urn:micasaverde-com:serviceId:HomeAutomationGateway1&action=RunScene&SceneNum=1"

3. Create the script files XBMC will run to send the http request to the Home Automation controller

OK so now we need to look at creating the script files for XBMC to run which will contain our http commands to be sent to the Home Automation Controller.

To do this I created a python script which runs a curl command to send the http request to the home automation controller.

Create the python script file

I am using EditPad Lite as my notpad editor program. Create a new file and paste in this code and use your own http command for Vera.

#!/usr/bin/env python
import subprocess
proc = subprocess.Popen(["curl", "http://192.168.1.100:3480/data_request?id=lu_action&serviceId=urn:micasaverde-com:serviceId:HomeAutomationGateway1&action=RunScene&SceneNum=1"])
and save it as a .py file I called mine lounge-on.py

As you can see the lounge-on.py script file sends the http request to Vera using curl. In this example my http command will run a scene with ID=1 which is my lounge lights on scene.

Also worth noting now, I am saving all my script files in this location on the OpenElec PC:

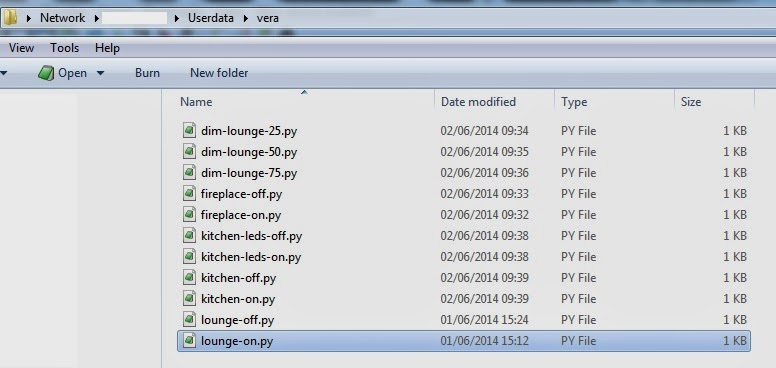
/storage/.xbmc/userdata/vera/

I just created a new sub-folder called vera via the OpenElec samba shares


OK at this point we can now test its working? To do this we need to run the python script.

type: python lounge-on.py and press enter


It should say OK and your lights should have just been turned ON in your room!

So now what? Well you need to repeat this process of creating these python script files for each Vera scene or device you want to control. So I now need a lounge off script.

lounge-off.py

#!/usr/bin/env python
import subprocess
proc = subprocess.Popen(["curl", "http://192.168.1.100:3480/data_request?id=lu_action&serviceId=urn:micasaverde-com:serviceId:HomeAutomationGateway1&action=RunScene&SceneNum=2"])

You can see my lounge off scene in Vera has an ID=2 / SceneNum=2

Now in terminal I can test the lounge-off.py script by running:

python lounge-off.py


image

Again it says OK and now my lights have just gone OFF.

4. Create / Tweak the XBMC keyboard.xml keymap file to add support for your new keyboard shortcuts in XBMC

Now we need some way for XBMC to be able to run the python .py script files, when we press our keyboard shortcuts / send them from the Harmony IR remote control handset.

Look in this folder on your OpenElec PC:

/storage/.xbmc/userdata/keymaps

Is there a keyboard.xml file in there? If not you will need to copy the master / default file from the system: /usr/share/xbmc/system/keymaps in to your /storage/.xbmc/userdata/keymaps folder

For example this command in terminal would copy the default keyboard.xml file in to your userdata/keymaps folder

cp /usr/share/xbmc/system/keymaps/keyboard.xml /storage/.xbmc/userdata/keymaps/keyboard.xml

We now need to edit the keyboard.xml file, to add in support for our keyboard shortcuts in XBMC, so I opened it in my EditPad Lite editor.

image

You can see in the global section at the top I have added two lines of code:

<A mod="ctrl,alt">RunScript(/storage/.xbmc/userdata/vera/lounge-on.py)</A>

<B mod="ctrl,alt">RunScript(/storage/.xbmc/userdata/vera/lounge-off.py)</B>

I wanted my keyboard shortcuts to be CTRL+ALT+(LETTER) for example CTRL+ALT+A and CTRL+ALT+B

That’s what this part of the code is <A mod="ctrl,alt"> a modifier for CTRL+ALT+A

We then RunScript and call the python script

RunScript(/storage/.xbmc/userdata/vera/lounge-on.py)

and close with </A>

Save the keyboard.xml file and reboot your OpenElec PC for the changes to take affect.

So what this means if I press CTRL+ALT+A on a keyboard XBMC will run my lounge-on.py script.  And when I press CTRL+ALT+B XBMC will run my lounge-off.py script.

5. Program your Logitech Harmony remote with the new keyboard shortcuts (MCE IR Keyboard required)

OK we are getting there, now we need to teach our Logitech Harmony remote control handset the keyboard shortcuts i.e. CTRL+ALT+A and CTRL+ALT+B

In the Harmony software or via the online myharmony.com site depending on which Harmony remote you have (I am using the Harmony software and a Harmony 895 remote).

Connect your Harmony remote via the USB cable to your workstation PC and then go to the Media Center PC device and select learn IR

image

Scroll down to the bottom and under Learn a New Command enter a name for your new command and click the Learn New Command button

image

You will then see this screen.

image

Now position your Harmony remote control handset and your MCE IR Keyboard, so you can teach the Harmony remote the new keyboard shortcut.

image

Press the keyboard shortcut you wish to teach the Harmony in my case CTRL+ALT+A

The Harmony software should then say Key Detected

image

It will then ask you to enter the keyboard shortcut a second time to confirm it.

Now on the Media Center PC device select Settings

image

Select Customise Buttons

image

Select the Additional Buttons tab and scroll to the page on the LCD screen where you would like to add your new custom buttons.

Type a name for your new button “Lounge On” and in the drop down list select the new command you just taught your Harmony “LoungeOn”

image

Repeat this process and teach your Harmony the other keyboard shortcuts and create new buttons on your Media Center PC device LCD screen.

You will probably also want to edit your Media Center PC activities and add the new custom buttons to those activities as well.

These are two photos of the new buttons I have added to my Harmony 895 LCD screen.


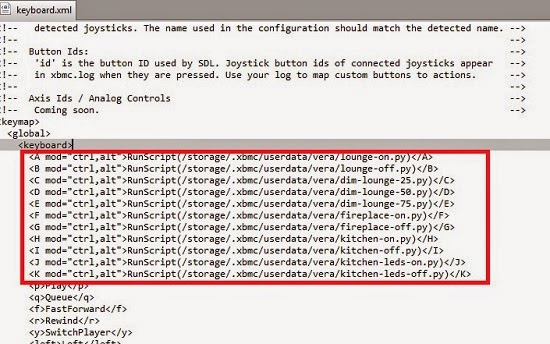
These are the new lines of code I ended up with in my Keyboard.xml file I used CTRL+ALT+A to CTRL+ALT+K


Now point your Harmony remote at your OpenElec XBMC PC and press one of your new custom buttons, if its all working your lights should come on / off etc.

Summary

I’ve only got all of this working today on one of my HTPC’s and I’ve not had much time to test it, but so far it is working flawlessly, I press a button on the Harmony and my lights react immediately. I’ve also wrote this blog post quickly and I hope there are no serious errors, but all of this in Linux for me is still really a work in progress!

If you are a Linux guru? Please look at this post here I need help enabling the mce_kbd IR protocol on my other HTPC which has the iMon VFD/IR.

If anyone wants a copy of my .py script files? Let me know and I will post them up on the net somewhere.

UPDATE: Check out PART TWO here, I have added feedback pop-up notifications in to the XBMC user interface, so you know if the python script has been run by XBMC.

Friday 16 May 2014

Intel Support / Returns not as good as they use to be?

I'd like to hear your feedback on the quality of support you have received from Intel recently? I had to return one of my Intel DH67CF Mini ITX media boards as it just quit and died. There was a three year warranty on the board and mine was well within its warranty period. I contacted Intel support and they went through a few diagnostic things and at the end they raised an RMA and told me to contact DHL to arrange for it to be sent back to them.

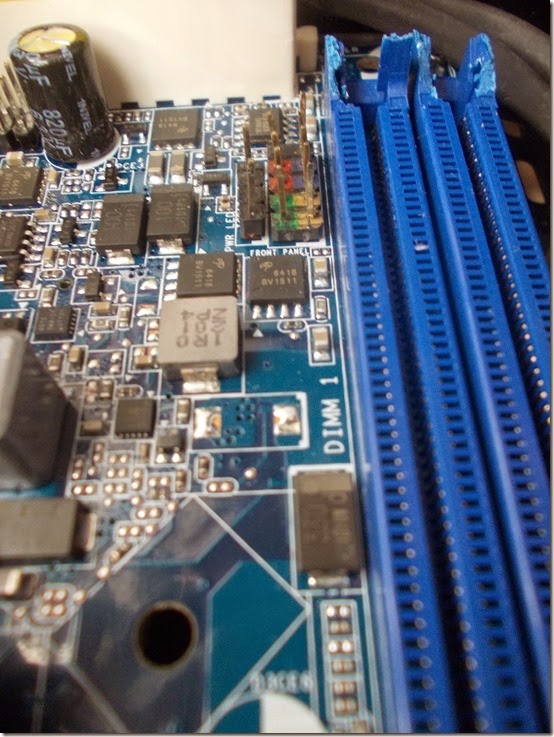
Four or five days later a "refurbished" replacement motherboard arrives back here. The motherboard worked OK with my HTPC after I resolved an issue with a short, however the board was physically damaged two of the RAM slot clips and parts of the actual blue plastic slots had been smashed right off. I hadn't done this so I wondered if it got damaged in the post, however looking in the bottom of the bag and in the box there were no plastic parts to be found, so Intel must have sent me the replacement board in this condition to begin with, see photo.

DSCN1496

I contacted their support again and sent them said photo and explained the situation, I was told that shouldn't have happened and they raised a second RMA for me to send the replacement board back to them and for me to get yet another one.

So a few days ago the second replacement board arrives, however this board does not work and has an obvious problem with the video sub-system, see the YouTube video below. I have tried this second replacement board with two different known to be working power supplies and with two different RAM chips. I've tried two different HDMI cables one brand new. I have tested the board in and outside of the chassis and no matter what I try the video corruption fault exists, I either get fuzzy static on the screen or rapidly flashing colours or blank black screens or horizontal bars with glitching graphics.

I am not using a PCI graphics card just the on-chip Intel HD2000 graphics. I am using a second generation Intel i3 CPU and that is the only thing I have not swapped out as I haven't got another one handy, but the CPU worked OK with the last board.

So I reported all of this back to Intel support today and now they are trying to fob me off and are blaming my power supplies and saying they are not supported. The power supplies I have tried to use are a Corsair HX620W full ATX PSU and a genuine PicoPSU 150W with the DC power brick which are both brand new. I have used this particular and many other HTPC's with PicoPSU's and these Intel boards for years with no issues.

Sounds like a load of bull so they can void my warranty and do me out of a working replacement board, so I’m not very happy with Intel customer service at the moment. Think I will contact their UK head office if its not sorted out. Plus its all the time I have wasted with these replacement boards, I’ve been messing with this PC all day today.

Let me know if you have had any similar recent experiences with Intel?

UPDATE: The third replacement motherboard from Intel is a winner! Everything is working again now and I have my HTPC back up and running. Only issue was when using the PicoPSU 150W when the PC is turned off S5 Shutdown for some reason the CPU fan remains spinning. When using the full sized Corsair ATX PSU the CPU fan turns off OK. As this is a fanless chassis anyway's and the PC is actually being turned off to S5 Shutdown I've built the PC as is and seems to be working fine at the moment.

I even fixed the problem with the Inteset CIR board in Linux / OpenElec and it not turning on the PC from S3 or S5. 

Thursday 15 May 2014

Installing SqueezeLite on OpenElec / XBMC (Shared audio output device) UPDATED

UPDATE 2:

As of OpenElec version 5.0.X Kodi it appears .mp3 playback with Squeezelite is now broken due to missing libraries required for mp3 playback. I can still play .flac .wma and .m4a audio files OK however. There is a thread here on the OpenElec forum where they are discussing this issue and possible work a-rounds. As yet I have not fixed mp3 playback on my own system and am still looking in to it.

Sometime later..

I seem to have mp3 playback working again, you can see how I did this here. Basically you need to update SqueezeLite to a later version it seems. I have updated the article below with the new download links and information!

I have re-tested the SqueezeLite player playback with the following types of audio files and I was able to play them all OK.

.mp3 .wma .flac .m4a (AAC) .ogg

END OF UPDATE

Its taken me along time to work out how to do this and I finally have it setup and working today! So I thought I would write about it here on my blog, so I don’t forget how I did it.

Basically I wanted to run SqueezeLite as a background service on OpenElec and for SqueezeLite and XBMC to use / share the same HDMI audio output device. Not too much to ask for you would think and this is a ten minute setup in Windows however in Linux its taken me much longer to figure it all out.

Note: I have only tested this on OpenElec Frodo V12.2 and not on Gotham, as I haven’t upgraded to Gotham yet. If you try this and it works on Gotham please let me know. (See the update at the end of this post).

Some background, my HTPC is connected to my Denon AVR amplifier via the HDMI cable. I have a 5.1 speaker setup on the AVR in my living room. SqueezeLite if you don’t know is a Squeezebox software emulator, like SqueezeSlave and SqueezePlay etc. SqueezeLite is still being actively developed and is the one you should be using. The reason I wanted SqueezeLite to run as a background service on the OpenElec HTPC, was because I also have a Squeezebox in my kitchen connected to a pair of stereo speakers mounted above my kitchen cabinets. And I wanted to be able to play the same music in the living room in sync with the kitchen room. As the Logitech Media Server software supports playing zones in sync this is ideal.

1. Download SqueezeLite

OK lets get started first you need to download SqueezeLite for use with OpenElec. The download page is here. I used this version: Squeezelite 1.5 Linux ALSA Intel 64 bit as my HTPC is Intel based.

EDIT: There is a new download page for SqueezeLite for Linux which is here. I wasn't totally sure which one to download for my Intel based HTPC so I picked this one "squeezelite-1.8-ubuntu-lts-x86_64"

2. Install SqueezeLite

The download contained just one file called squeezelite-x86-64 with no file extension, being a Linux newbie at first I had no idea what to then do with this file? You need to create a new directory on your OpenELec PC and copy the squeezelite-x86-64 file in to that new directory. I used this path: /storage/.xbmc/userdata/squeezelite

EDIT: The file downloaded from the new download page was called squeezelite-1.8-ubuntu-lts-x86_64.tar.gz I extracted this file on my Windows 7 workstation using Winrar, I then ended up with two files one called License.txt and one called just squeezelite with no file extension. You need to create a new directory on your OpenELec PC and copy the squeezelite file in to that new directory. I used this path: /storage/.xbmc/userdata/squeezelite

I used FileZilla FTP client to connect to my OpenElec PC and copied the squeezelite-x86-64 squeezelite file in to my new /storage/.xbmc/userdata/squeezelite folder, or you can just use Windows Explorer and enter \\IPADDRESSOFOPENELECPC to access the Samba shares.

image

Next you need to access the Terminal in OpenElec, to do this I use Putty for Windows on my laptop and can then connect to Terminal on my OpenElec PC. You need to select the SSH connection on port 22, enter the IP address of your OpenElec PC and use the default username: root and the default password is: openelec

image

We need to be able to access terminal in order to make the squeezelite-x86-64 squeezelite file executable. The terminal window looks like this.

image

Now navigate to the new squeezelite folder we created, enter the command shown below and press enter

image

The screen should then look like this one

image

Now we need to use this command: chmod +x squeezelite to make that file executable. So go ahead and enter that command and then press enter

image

3. Picking the correct Audio Output Device

OK now we need to think about which audio output device we would like SqueezeLite to run on? As I already stated due to my setup I wanted SqueezeLite to run on the HDMI port. However you may want it to run on the 3.5 analogue port or the digital SP/DIF port? depending on your setup and requirements.

Whilst still in Terminal we can list all the audio output devices on the system, to do this use the aplay –l command

image

I am using an Intel DH67CF Mini ITX media mother board in my HTPC and in the screen shot above you can see what audio output devices I have listed.

** In fact you might be better running this command instead: /storage/.xbmc/userdata/squeezelite/squeezelite –l

SqueezeLite then lists the audio output devices it finds on the system as shown in the screen shot below. If you cannot read it, click here for a larger image.

image

The device from the above list that I need to use is this one: hdmi:CARD=PCH,DEV=1 keep that in mind for later on…

4. Review the max sample rate

Now that we know which audio output device we want to use with SqueezeLite, we need to know what is the maximum sample rate? Connect back up to Terminal using Putty and issue this command:

/storage/.xbmc/userdata/squeezelite/squeezelite -d output=debug

Click here for a larger screen shot of the debug output

image

There is a line that says: output_init_common:394 supported rates: and lists the rates, find the largest number in that list? Mine was 384000

Press Ctrl+C to exit this command

5. Construct the SqueezeLite run command

Ok armed with all of the above information we can now start to construct our command to run SqueezeLite. This is the command I used:

/storage/.xbmc/userdata/squeezelite/squeezelite -o hdmi:CARD=PCH,DEV=1 -m 00:00:00:00:00:fe -r 384000

-o specifies the audio output device I want to use, in my case it was: hdmi:CARD=PCH,DEV=1

-m specifies the mac address the SqueezeLite player will use, I believe it can be the real mac address of the NIC on the PC or you can just make one up as I did, as long as each SqueezeLite instance you have running on your LAN has an individual mac address you should be OK.

-r specifies the maximum sample rate and also importantly enables audio output device to be off when squeezelite is started

One you have constructed your SqueezeLite command, you can test it by running the command in Terminal. Does it work? Do you have a new Squeezebox showing up in the LMS webpage? and can you play / hear an album when selecting that Squeezebox?

image

Tip: You can rename the new SqueezeLite player to a name of your choice like “XBMC01 – Living Room” in the LMS webpage – settings – player tab – player name

image

This is the LMS (Logitech Media Server) webpage

image

Here in the drop down list you can see my new SqueezeLite player aka “XBMC01 – Living Room”

image

6. Autostart SqueezeLite on boot up

OK so our command to run SqueezeLite is working we now need to be able to start SqueezeLite every time you turn on your OpenElec HTPC. To do this I used the OpenElec autostart.sh config file. If you haven’t got one already you need to follow this Wiki page here to create one.

EDIT: The OpenElec autostart.sh wiki page contents have changed, it use to tell you how to go about creating your autostart.sh file and now it does not. So this is how to do it:

Using Putty terminal in to your OpenElec PC.

Type these commands one at a time:

cd /storage/.config
touch autostart.sh
chmod +x autostart.sh
nano autostart.sh

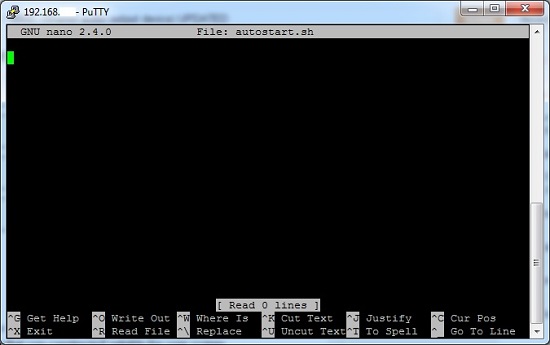
You will then see a screen like this one:


In the autostart.sh config file add in the below code to automatically start your SqueezeLite player. Obviously change the SqueezeLite command to the one that you constructed suitable for your system.

#!/bin/sh
# Start SqueezeLite on the HDMI audio output device
(sleep 20; \
exec /storage/.xbmc/userdata/squeezelite/squeezelite -o hdmi:CARD=PCH,DEV=1 -m 00:00:00:00:00:fe -r 384000
)&

You can copy the code text above, then in putty just right click your mouse and the code will appear and then look like this:


Now press Ctrl + X on the keyboard to save and exit the nano editor. Select Y to save and then press Enter when you see: File Name To Write: Autostart.sh

You will then be taken back to the normal terminal command prompt. Now type "reboot" without the quotes and press Enter on your keyboard to reboot your OpenElec PC.

The SqueezeLite instance should now be auto started each time you boot up your OpenElec PC.

Restoring sound back to XBMC

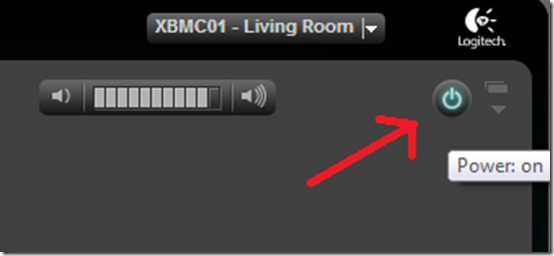
In this setup where XBMC and SqueezeLite share the same audio output device, you need to turn off the SqueezeLite player once you have finished using it, so XBMC will get its sound back. To do this just use the soft ON / OFF button on the LMS webpage or in your Squeezebox mobile remote control app etc.

image

image

Once the SqueezeLite has been soft powered off, the audio will return to XBMC.

Summary

I’ve been wanting to do this since I switched to XBMC and Linux over a year ago and have tried now and again to get it working without much luck. However eventually I was able to piece everything together from various forum posts and figure out how to get it working.

The other Squeezebox in my Kitchen is actually SqueezeLite running on my Windows Home Server, so I don’t actually have any hardware Squeezeboxes. I know syncing software Squeezeboxes is never as good as with hardware Squeezeboxes, however my experience of syncing these two rooms together using SqueezeLite has been very good so far, much better than when I was using SqueezeSlave in the past with Windows MCE.

Now I need to setup SqueezeLite on the OpenElec PC’s in our bedroom and in the kids bedrooms.

UPDATE 1:

I've tried this on OpenElec 4.0.4 Gotham now, it works OK but I felt the need to change a setting which was in the XBMC Settings - System - Audio - Keep Audio Device Alive - OFF

Changing this setting to off then allows the SqueezeLite player to use the audio device quicker when you start playing an album in LMS. However on my HTPC connected to my AVR turning this setting off did seem to then have some side affects on the navigational sounds you hear in XBMC when moving around the UI.

When you have finished playing your album in LMS and when you soft power off the SqueezeLite player it can take a little while for the audio to then be restored back to XBMC.

In Frodo it all seems to work a bit better and a bit faster, it still works well in Gotham, if you are aware of these slight niggles.

Until I figure out how to simultaneously at the same time allow XBMC and SqueezeLite to share the same HDMI audio device this is as good as its going to get.