Google Search

Custom Search

Powered by...

Find us on Facebook

Wednesday, 10 November 2010

Amulet Voice Remote Control – Part1

I’m going to be taking an in depth look at the Amulet voice remote control for Windows Media Center. Amulet contacted me and asked if I would like to look at an evaluation unit. As I always like to try new gadgets I said yes I would, thank you very much!

The concept is you can control and navigate around Windows Media Center using your voice, sound cool? well it is!

Firstly their website can be found here and I recommend you view the demo video here before reading my series of blog posts about this remote control! I believe you can purchase these remote controls already in the US and they will be launched in the UK soon, I don’t have any details of when and how much yet.

What’s in the box:

DSCF8609

DSCF8610

DSCF8613

DSCF8614

Well you get the remote control, a rechargeable battery for the remote, a USB lead to charge up the remote, software installation disk, a well written and easy to follow quick start guide and two cards that have the various voice commands you can use and the USB dongle that plugs in to the PC. A charging cradle for the remote to sit in might have been a nice option, but I guess that would push up the overall cost of the unit.

First impression of the remote control itself, is that it feels well made and a quality product, it looks good as well! The button layout is very similar to your standard MCE remote control. Most of the buttons are back-lit in white, except the number and teletext buttons at the bottom, as soon as you pick up the remote control it lights up automatically. The big circle thing at the top lights up red when you tilt the remote control upwards towards yourself, this means Amulet is listening to you and ready for your voice command.

One negative thing I have to say about the hardware is when you press any of the buttons they click, you hear a clicking sound. I would prefer them to be silent especially the directional arrows and OK button that get pressed allot, the clicking got to me after a while.

Whilst this remote control is not an advanced universal remote control like Harmony and the Pronto range it does have some universal remote control features, for example I was able to quickly and easily program it to control my HDTV’s volume up and down and TV power toggle. The four coloured teletext type buttons at the bottom can also be programmed to control other devices.

Eddy Carroll from Amulet explained this feature to me so I’ve quoted what he said about it below:

‘'The four coloured teletext keys at the bottom of the remote double as device keymap selection buttons. The default keymap is Media Center itself. You can train any of the keys in the other four keymaps by entering learning mode, then pressing a coloured key followed by the key you want to learn (e.g. press and release Red, then press Play, to learn the Play function on the red keymap). In normal use, you press Red to select the red keymap, and all remote buttons then follow the red keymap until you return to Media Center mode by pressing the green Start button.

So for example, you could program Red with the full set of TV buttons, blue with a DVD player or set-top box, yellow with your amplifier codes, etc. Memory for learnt commands is somewhat limited, so you won't be able to fully populate every keymap, but there is certainly enough for the basic functions.”

I certainly wasn’t expecting this level of support for controlling other devices so this appears to be very good!

Setup was easy, insert the already pre-charged battery in to the remote control, plug the USB dongle into the back of the PC, no drivers were required from me, it just installed itself as an audio device. I then inserted the software CD which auto runs and starts the setup.

Setup process:

Amulet-Install1

Amulet-Install2

Amulet-Install3

Amulet-Install4

Amulet-Install6

After setup Amulet starts to scan your media files in the background behind the Media Center window it launches.

Amulet-Install5

Amulet have their own scanning software that indexes your media content. By default Amulet only looks in the Windows 7 / WMP12 / Media Center library folders i.e. Music, Pictures, Videos etc. So if your like me and do not use the native 7MC movie library for your DVD’s etc, then Amulet won’t find these movies, you have to edit an .ini file to add in additional locations of your media content, for example that might be located on your WHS or NAS.

In part two we will be looking at what gets installed in to Media Center and how the Amulet add-in user interface looks and works.

http://www.phaze1digital.com/

Tuesday, 9 November 2010

My Movies for iPad

My Movies for iPad has been released. Unfortunately I haven’t got an iPad to test this out with, but it sounds pretty good!

The below is from the My Movies newsletter.

“It is with great pleasure that I can send out this newsletter and let you know that "My Movies for iPad" is now available on the App Store. You can see the application on the iTunes website here.

Many of you are already familiar with or users of My Movies for iPhone Light or My Movies for iPhone Pro - My Movies for iPad is designed to work either as a standalone product, or along with the iPhone, Android or Windows Desktop software which means that you simply log on to your user account, and let the iPad application synchronize your full collection automatically.

Users of My Movies for Windows Media Center will find the iPad application even more interesting, due to the fact that it can connect to your My Movies for Windows Media Center and allow you to start playback of titles on the media center directly from the iPad. The current version allows for use with one Media Center and only on the host machine, which means it will not operate on extenders - we are however already working on the next update for this functionality, and the next version will support multiple hosts and multiple attached extenders, and will feature a full remote control functionality for Windows Media Center.

The application is available now for a price of USD 6.99, EUR 5.49 or GBP 3.99. This newsletter can only go though a small list of the full functionality, and we recommend that you take a look at our "My Movies for iPad" product page, which includes detailed descriptions and a full screenshot gallery - the page is available here.”

Monday, 1 November 2010

Introducing VIPID Home Cinema Custom Intros

I’ve been beta testing a new website that allows you to easily create your own custom Home Cinema intro videos. Such as the 20th Century Fox, Pixar and Universal intros, where you can change the text to your own and then have the video rendered by the website. These intro clips could then be used with My Movies for Media Center that supports playback of intro clips before the main film is started. Can Media Browser do this as well?

On this page you select the template from which you wish to create your intro clip from, there are currently 11 templates.

VIPID-Blog1

Its just a case of entering your own text in to the different fields, selecting the desired resolution from the left hand side, i.e. 1080P or 720P and clicking the Create button!

VIPID-Blog2

Also on the left hand side you can see how many points you need to create this particular video. I selected 1080P which is 650 points, 720P is 550 points, points translate in to $$$ and you can purchase different packages with different amounts of points.

After clicking the Create button you are shown a page like the one below. This is called the cooking progress. I found in IE that the progress percentage bar was a bit irratic and didn’t always move unless you refreshed the page, it worked much better in Firefox however. One of the Developers I have spoken too called Andrey from Russia said they were aware of the issues in IE and were working on fixes.

VIPID-Blog3

The Video creation or cooking time can take between 5-10 minutes, which is very fast for rendering clips like this!

Once your video has finished cooking you can go to the My Videos area and see your completed videos. Here you can preview the videos and download them. The videos are currently only created in .MP4 and .FLV (Flash) formats, although Andrey informs me they do have possible plans for other file types such as .AVI, .MPG and .WMV

VIPID-Blog4

Download page:

VIPID-Blog5

I don’t have the final URL web address of the VIPID website that will be used when the site goes live to users, but when I have it I will update this post and let you know!

Overall a great website that does exactly what you’d expect and it is very easy and fast to use. Highly recommended!

20TH Century Fox – Custom Intro Video


http://www.youtube.com/watch?v=L_3-rCEod48

UPDATED:

The VIPID website addresses will be: www.vipid.me or www.vipidme.com

I've also been informed by the VIPID Team that 480x270 resolution videos will be free, but you cannot create more than 3 within a 24hrs period.


http://www.phaze1digital.com/

Easily create Home Cinema intro videos

This is a sneak preview of a video I created using a new Home Cinema custom intro creation website, that is currently in private beta. The site should launch in a few weeks time and I will post again soon with more details about it and how you can sign up, it will be a paid service, but what a service! you can create Hi-Res 1080P / 720P clips like the one below in about 5 minutes and its extremely simple to use. It doesn’t get any easier than this!

Custom Pixar Intro Video

Pixar

www.phaze1digital.com

Thursday, 21 October 2010

Has your XBOX 360 ever broken?


My first generation XBOX 360 has died for a second time with the dreaded 3 Red Rings of Death. Microsoft UK are now wanting 68 UK pounds to have my console repaired. That seems like allot of money when you can buy a new 4GB slim model for 150 quid.


My console first died whilst I was living in Thailand and at this time when checking the UK XBOX support website I would have been entitled to a free no cost repair according to their online system. However I could not easily post my XBOX from Thailand back to the UK for repair and they would not have sent it back to me in Thailand anyways.

I recently moved back home to the UK so I checked the XBOX support site again and now their system states a fee of 68 pounds is required. I contacted XBOX support via email but they just said they could not offer me a free repair at this time.

So that’s that, I’m not paying to have it repaired and I doubt very much I will buy a new XBOX from Microsoft again. I’ve heard many stories from my own friends and people I speak to in the forums that their XBOX’s have died at some time or another.

I did some searches on eBay UK and US today and was amazed at the numbers of faulty and broken XBOX 360’s listed for sale, page and pages of them!

eBay UK search results

eBay US search results

If you have had problems with your XBOX 360 and feel frustrated about it, then please leave a comment and let us know!

Friday, 15 October 2010

My new Shark007 x64 codec configuration

I recently built a x64 bit Windows 7 Ultimate HTPC. In the past I'd mainly stayed away from x64 bit OS and always used 32bit, mainly because I was usually testing lots of different applications and utilities and also just because I felt more comfortable with 32 bit and codec setup.

But on this latest HTPC for my own living room I decided it was time to try x64 bit properly and make it stable. If you are using the Shark 007 codec pack on x64 you first need to install the x86 version of the codec pack as nornal, in addition to this you then need to install the x64 components.

By default on 64 bit Windows 7, the default WMP12 player is the 32 bit version, there is also a 64 bit version of WMP12, Shark recommends sticking with the 32bit version of WMP12 and not changing the default to be the 64 bit version. The Windows Media Center by default is 64 bit ! The x86 version of the shark codec pack is used to configure 32 bit players such as the default WMP12. And you use the x64 bit version of the shark codec pack for configuring 64 bit players such as Media Center.

Before I continue, at this point I'd like to thank Shark for his help setting up my new x64 bit HTPC as I did get stuck in places and required his help, some of the below information was passed on to me from Shark and if you are using his codec pack and find it useful, please consider making a donation to him as I expect releasing these codec packs and supporting them is very time consuming indeed.

I'd like to state that the below settings are working for me on my HTPC for my files, this is not to say these exact same settings will work for you as you expect! I'd also like to point out that my HTPC is based on an AMD Processor and an onboard ATI HD Radeon 4200 graphics chip. Also I currently don't have an AVR so I am not passing through or bit streaming audio to the AVR, its just a simple HDMI connection from the PC direct to the HDTV. But I will mention audio pass through later.

When launching either version of the Shark codec pack from the start menu you should always right click the icon and run as administrator. Ok so lets get started!

The first tab is the configure tab, on here you can choose which version of WMP12 is the default, stick with the 32 bit version as recommended. I also never use subtitles so I change the Subtitle control to "No Subtitles". You probably want to change the Hardware Output to TV/Projector.

I found some of my HD MKV movies where stuttering so I decided to enable FDDShow DXVA (hardware acceleration) on the H264 tab, which meant on the Config tab clicking Configuration Items and selecting FFDShow DXVA

Under the FFDShow DXVA configuration, I unchecked Subtitles, as I found some MKV's were showing the hard subs. I also checked H264 and VC1 under DXVA codecs enabled.

I did not change anything on the Misc tab.

Ignore the tool tip on this screen shot, I don't think I changed anything on the Audio tab either, however if you have an AVR and want to pass through / bit stream the audio to the AVR you should select: use pass-through (Digital Audio) under FFDShow S/PDIF pass-through. You'd probably select 5.1 as well from the Choose speaker configuration. When I am using an AVR I don't use AC3Filter as I always had problems with it and just use FFDShow.

On the AVI tab I have been selecting Gabest's splitter lately, but Shark recommends using the Microsoft Splitter here. So that's what I am using at the moment.

On the H264 tab I select the settings you can see that have red rings round them, as I said I enabled FFDShow DXVA for hardware acceleration.

On the MKV tab I am using the Haali Splitter and there is also a DIVX Media Foundation Splitter, this is for XBOX 360 users apparently. However I had issues with this setting until Shark explained it to me, you MUST disable the DIVX Media Foundation Splitter on 64 bit OS. If you don't, when you play MKVs and other files in Media Center they will not use FFDSHow but the Microsoft codec. So I have to have this disabled on my X64 HTPC.

But I also have an XBOX 360 extender, I've not tested playing any MKV's on the extender yet, but ideally you would want the DIVX Media Foundation Splitter enabled for playback on the XBOX 360, which means manually changing this setting first. Also AVI's on my XBOX 360 MCX are not playing that well, slowing down and speeding up. But if I play the same movie that's on the WHS from the XBOX 360 dashboard video library it plays fine.

Apparently this is not a problem for 32bit OS as you can have the DIVX Media Foundation Splitter enabled and it will also still use FFDShow in Media Center OK.

MOV OGG tab I did not change anything on this tab, I can play some 1080p .MOV movie trailers I downloaded from Apple OK in Media Center, I've not tested the .MOV files my little digital camera creates yet.

On the MPG MP4 tab I am using Gabest's splitter for MP4 playback, I did play one sample MP4 video file OK in Media Center.

Under overall MPEG Playback 1/2/PS/TS I am using the default which is Automatic section.

Below is a quote from Shark:

"To playback TS variations such as M2TS etc., it is imperitive that you disable Media Foundation on the swap tab. If the source was blu-ray, you will also need to select the blu-ray splitter on the MPG~MP4 TAB. many of these m2ts files use VC1 instead of AVC(h264) for the video so you will also need to select a different decoder on the SWAP TAB for WVC1 content. I prefer setting MPC-HC for WVC1."

So during my test I tried selecting the Gabest's Blu-ray splitter but I found my Blu-ray ISO images on the WHS were stuttering badly in Media Center on the HTPC. In the end Automatic selection seemed to be better for me.

Swap tab, below you can see the settings I am using. The main ones to point out are:

FFDShow codec for XVID/DIVX/MP4v in DirectShow.

FFDShow for WVC1 instead of Microsoft

I also had to disable Media Foundation for a sample .M2TS file to play in Media Center.

The thing that has changed, is in the past with an AVR and when playing AVI files with 5.1 audio tracks in them I would have to disable DMO for them to play. You don't need to do this any more apparently.


That's it!

I can play the following on my Media Center:

  • MKV's
  • AVI's (XVID)
  • DVD rips in VIDEO_TS
  • Blu-Ray ISO images (PowerDVD 10 within 7MC)
  • Media Center Live TV
  • Recorded TV (WTV)

Above are the main video types I use, however I also tested the file types below in Media Center using sample video clips I have:

  • .DVR-MS
  • .FLV (Flash)
  • .M2TS
  • .MOV
  • .MP4
  • .MPG
  • .VOB
  • .WMV

I also used GraphStudio during my codec setup to render media files and see which codec were being used in the graph.

If anyone has any comments or suggestions please let me know, also I am not a codec expert who knows everything about them so please don't ask me for technical support with codec, I would recommend heading over to the Shark 007 forums here.

http://www.phaze1digital.com/

Thursday, 14 October 2010

Two highly recommended WHS V1 add-ins

I recently built my first WHS for my own home using my old desktop PC and whatever bits I had lying about the place. I’ve build several high-end rack mount WHS boxes for clients before, but not one for myself!

During this setup process I discovered two WHS add-ins that have made my system all the more better. These are not new or free add-ins and some of you will be using them already, however as I liked them so much I wanted to mention them here on my blog.

The first is called Disk Management for Windows Home Server, by Tentacle software you can see their webpage here.

Description

“Disk Management is an Add-In for Microsoft Windows Home Server. This Add-In is designed for users who need more detail about their server's storage status than what the standard Server Storage interface provides.”

Features:

  • Detailed information for each disk in your Windows Home Server
  • Real-time temperature and activity monitoring
  • Capacity indicators for individual disks
  • Customizable disk names
  • Customizable 3D wireframe representation of your server

As soon as I’d create the 3D wireframe representation of my server and seen what information this add-in was now displaying to me in the WHS console, I bought a licence for it there and then! And also thought why didn’t Microsoft do this?

I can now see the used space on each individual hard disk, see temp stats, read/write activity indicators etc.

Overall an extremely useful add-in and worth the asking price.

Add-in #2

The next add-in I wanted to mention is called Lights Out. You can find the webpage for Lights Out here which is a blog done by some German dudes, if you scroll further down this page however they have kindly also written in English.

Now usually I am pretty bad with leaving PC’s turned on and running 24/7. At work I’d always leave my workstation(s) running constantly whilst everyone else was expected to shutdown their machines down every night, must be an I.T. guy thing! And even at home I use to leave my desktop running all the time. However I must be getting more green as I get older or more likely the cost of energy these days has gone up massively and I’m thinking about my wallet more.

So I wanted some way to turn my “recycled” WHS off when not in use, thankfully there is a brilliant add-in as I said called Lights Out which fits the bill! No pun intended.

Below is a bit from their website:

Lights-Out – The name says it all

“This Add-In is used to put a Windows Home Server into suspended mode or hibernation and resume on user defined events.”

Mode of operation

“Lights-Out monitors several sources for activity. As long as one source signals activity, the server is kept running. When the monitoring detects no more activity, the server is disabled.”

Basically it detects when your Windows PC clients (WHS clients) are active. There is also a Windows Client bit of software that you can install, this runs in the system tray and allows you from this icon to suspend an wakeup the server manually. You can also add IP devices to be monitored. For example I gave my XBOX 360 static IP address and then added this address to be monitored in the Lights Out settings.

The best thing about this for me, apart from it automatically putting your WHS to sleep (suspend) and then waking it up again when any clients connect, is the Up Time Diagram. The screen shot on their website doesn’t have much detail in it, the one below is from my own WHS.

You can easily see what is active and when! Great for routing out any problems with something staying awake and what time it woke etc.

On the 12 and 13th of October you can see I had a problem and the WHS and HTPC (MCX01) were on most of the night. Initially I thought it was the HTPC not going back to sleep after the WHS backup. However after seeing the start and end time of the backup I ruled that out as the problem.

Noting they woke at 2:30am, I then changed the Media Center update task on my main HTPC to run at 7PM instead of the default which is 2:30am The next night on the 14th both stayed sound asleep!

Up Time Diagram:

Click here for larger image

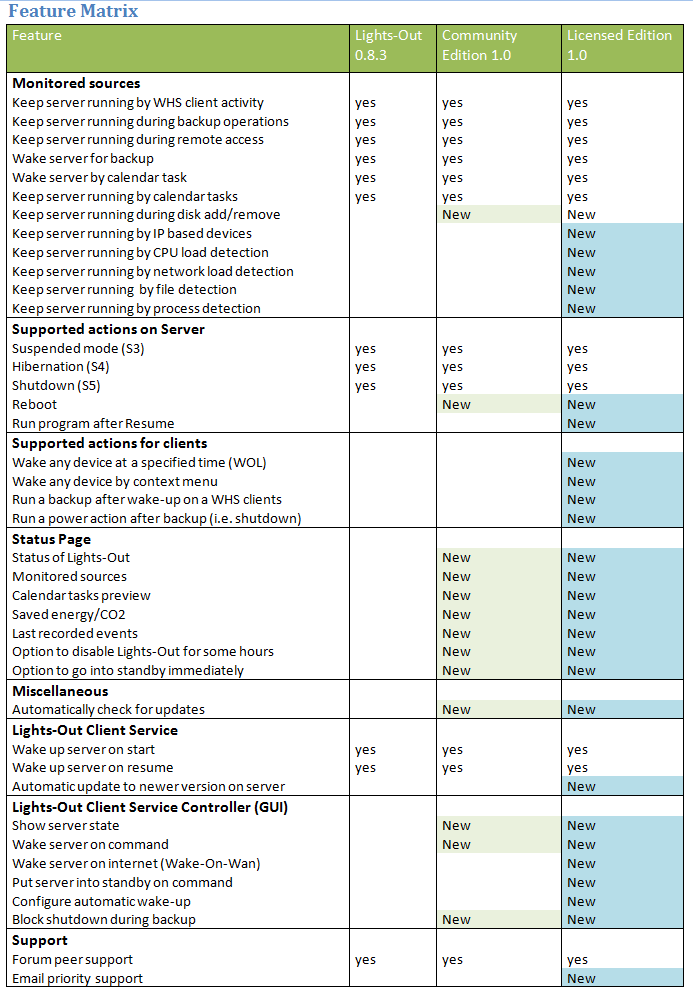
I’m still on the free trial, there is a free community edition and a paid version, there is a matrix comparison here I’m not quite sure yet what will stop working when my trial runs out however.

The only issue I have with Lights Out, is that I have a monitor keyboard and mouse hooked up to my WHS that is in the office room. If I am the WHS console directly it keeps going to sleep on me automatically if no other clients are active on the network. I have to remember to disable the Lights Out first.

Overall it works well and its certainly worth checking out. I just hope both of these types of features will be native in WHS Vail or these 3rd party developers release new versions for WHS Vail.

www.phaze1digital.com

Monday, 11 October 2010

My Channel Logos – Jazz up your Media Center Program Guide

I was setting up a new HTPC this week for our living room and one of the things I wanted to do was add channel logos in to the program guide. I’d done this previously using Big Screen EPG. However I found another great little utility called My Channel Logos who’s only job is to add logos in to your guide, unlike Big Screen EPG which can also be used to import guide data from 3 party sources.

Upon the first launch of My Channel Logos it will automatically download the logos for your region. Logos are currently available for the US, Canada, UK, Ireland, Australia, Germany, France, New Zealand.

Once the application opens it looks like the below and its really just a case of hitting the Auto Populate Logos button and your pretty much good to go.

However I did find that for the UK logos some were missing. But you can add your own custom logos, so I had to find some extra logos from Google images for the following channels:

  • The Big Deal
  • Channel One
  • Create and Craft
  • ITV2+1
  • Price Drop TV

The end result is nice looking channel logos in your Media Center program guide as shown below.

I believe My Channel Logos was a free application but now to download it, you must donate a minimum of $3.

www.phaze1digital.com

Fix Media Center Studio without jumping through too many hoops!

I tried a few times to fix Media Center Studio after updates release by Microsoft broke parts of its functionality. There was several threads on the Green Button forum about renaming .dll files or replacing them with blank ones and changing security permissions, which sounds like an easy way to give yourself a headache. None of these fixes seemed to work for me, I also tried a patcher program someone had released but still my Media Center Studio was busted.

Then a user on the Green Button forums kindly gave me a link to MCSFix.exe you can see the thread here. You need to create a shortcut to the MCSFix.exe in the startup menu. Or if you don’t reboot often you could create a scheduled task for it to run every hour or so.

So far its been working for me and my customised Media Center menu’s have remained in place.

www.phaze1digital.com

Monday, 21 June 2010

Turn your Windows Home Server V1 in to a VPN server

I was looking on the Internet for an easy to follow guide to be able to setup a WHS to act as a VPN server. However the guide I found on a popular WHS website didn’t seem to work for me. So I did it a way I knew would work using Routing and Remote Access which is part of Windows Server 2003.

Why would you want to do this? If you are away from your home and you want full LAN access to your home network then VPN on WHS is ideal for this. I’m sure most of you will have used VPN’s to connect to your companies corporate networks before when you are remote working, its the same kind of deal.

To setup your WHS as a VPN server you can follow these steps.

Remotely connect to your WHS using RDP.

To use Routing and Remote Access you first need to disable the Windows Firewall/Internet Connection Sharing (ICS) service.

Go to the Start Menu –> Run and enter Services.msc then press OK.

Scroll down and find Windows Firewall/Internet Connection Sharing (ICS) right click it and select services. Stop the service then set the startup type to disabled on the General tab.

WHS-VPN1[1]

Now open Routing and Remote Access

Start –> All Programs -> Administrative Tools -> Routing and Remote Access.

Right click the server name and select Configure and Enable Routing and Remote Access

WHS-VPN3[1]

You will then see the Setup Wizard, click Next.WHS-VPN4[1]

Select Custom Configuration and click Next.

WHS-VPN5[1]

Select VPN Access and click Next

WHS-VPN6[1]

Click Finish

WHS-VPN7[1]

Click Yes to start the Routing and Remote Access service.

WHS-VPN8[1]

WHS-VPN9[1]

Now we have to tell Routing and Remote Access which device on our network is doing DHCP?

Expand IP Routing and right click DHCP Relay Agent and click Properties.

Enter the IP address of your DHCP service. Normally your broadband router / gateway. In my case this is 192.168.1.1

Click OK.

WHS-VPN2[1]

Now we need to specify which users on the WHS will have VPN access. Go to the Start Menu and right click Computer and select Manage.

In the Computer Management console, select the Local Users and Groups and then Users from tree on the left.

WHS-VPN10[1]

On the right hand side right click the user account you want to enable for VPN access and select Properties.

On the Dial-in tab select Allow access under Remote Access Permission (Dial-in or VPN) and click OK.

WHS-VPN11[1]

You now need to configure your router to allow inbound the VPN ports to your WHS.

These ports are:

  • 1723 TCP
  • 47 TCP

How you do this will depend on the make and model of your broadband router. But basically we need to use NAT to port forward requests coming from the Internet (WAN) to the Windows Home Server on the LAN.

My test router was a D-Link DSL-2542B and I had to select Advanced Setup –> NAT

Its also sometimes called Virtual Server on some routers.

You might be able to see on this screen shot that I have TCP ports 1723 and 47 port forwarded to the internal IP of the WHS which is our case is 192.168.1.6

WHS-VPN12[1]

That’s it, you just need to setup a Windows Client VPN connection on your PC or Laptop and point it to the WHS domain name for your server and login with the user account you enabled for VPN access earlier.

Windows 7 PPTP Client VPN connection.

WHS-VPN13[1]

Clubhouse Tags: Clubhouse , WHS , VPN