Google Search

Custom Search

Powered by...

Find us on Facebook

Monday, 24 January 2011

Control your Z-WAVE modules in Media Center - Power Controller MCE

I’ve been testing out some Z-Wave kit recently, for those that don’t know Z-Wave is a home automation protocol / standard, think X10 but its much newer and works on RF signals. For more information about Z-Wave see here.

Initially I was thinking about using Martin Millmore’s Power Controller MCE add-in with Byebye standby equipment which is available in the UK. But I really wanted to try Z-Wave rather than Byebye standby. So I contacted Martin and after this a plan formed and thanks to a generous donation from my friend in Hong Kong (Thanks Tom), I was able to purchase enough Z-Wave equipment for myself and for Martin to test and develop with.

We each had an Aeon Labs Z-Stick with is a USB dongle “When attached to a host processor, it becomes a Z-Wave communication device, which exposes the Zensys API (SerialAPI) through integrated USB.” This basically allows the PC to be able to send commands and receive status updates from the Z-wave devices around your home.

If I was to choose again however I would have purchased a Euro version of the ControlThink ThinkStick USB dongle instead, as this is meant to work much better with software such as mControl and the Melloware Z-Wave Commander iPhone / Android apps. As these use the ControlThink SDK.

One important thing to keep in mind is that US Z-Wave and European Z-Wave products work on different RF frequencies so ensure you are buying the right equipment for your locale.

I also purchased a mixture of Z-Wave Lamp dimmer modules and appliance modules and also an in wall dimmer switch. These were purchased from Z-wave-Products a UK website.

Once Martin had received his test equipment he was able to use an Open-Source Z-Wave SDK rather than the ControlThink one and greatly expand and develop the functionality of Power Controller MCE to include control over Z-Wave devices. I did quite allot of testing on the various software versions that he sent to me and came up with a few ideas as well.


Development is still on-going and Martin is working on updating his Android phone application, but you can find a released version and more information of Power Controller MCE with Z-Wave support on the Millisoft website here.

You can turn devices on and off, dim lights and lamps if they are connected to dimmer modules, you can create Zones like Living Room, Master Bedroom and then group the devices in to the correct rooms. You can create scenes for example All Lights On / Off or dim lights for a Movie scene. Set scheduled events.

One of the best things that you can do which was my idea! Is you can assign keyboard key combinations to Z-Wave devices. So for example I can assign Ctrl+Alt+A to my lamp and it will turn off Ctrl+Alt+B to turn it on Ctrl+Alt+C to dim down and Ctrl+Alt+D to brighten etc.

I can then teach my Logitech Harmony IR remote control these key combinations using a standard MCE 2005 IR keyboard. I added a dummy Lighting Controller device in the Harmony software and assigned my newly taught key combinations to this device. I can then control the lamp with the Infra-Red Harmony remote control! Event better I can insert these key combinations in to activities. For example on my Harmony remote I have a My Movies activity, I added in an IR command to dim the lights 50% so now whenever I enter the My Movies activity the lamps in the lounge auto dim down and if I exit the activity and enter another activity they go to full brightness again.

There is also a WHS add-in for Power Controller MCE, this allows you to install the Z-Wave USB dongle into the home server and then on each Windows 7 Media Center PC you can install the MCE add-in and each one of these PC’s will then be able to control your Z-Wave devices via the USB dongle on the WHS box, Sweet!

If your a Media Center user and taking your first steps in to Home Automation with Z-wave or Byebye standby? Power Controller MCE might be a good place to start. I think over time you would probably want to move on to something more sophisticated like mControl or HomeSeer but it you want simple control over a few Z-wave lighting and appliance modules and to be able to link it in with Media Center and your existing universal remote control then I’d definitely recommend taking a look at Power Controller MCE.

I’d like to thank Martin for his hard work so far coding and also to Tom for his generous donation which has made this possible.


www.phaze1digital.com

Saturday, 8 January 2011

My Movies–Missing metadata whilst playing a movie?

This article applies if you are using My Movies for Windows Home Server. If you are using a standalone My Movies Server / Client on Windows XP / Vista / Seven and you do not have a WHS then this does not apply to you.

Do you have missing metadata on the native Media Center overlay screens whilst playing a movie?

Play a movie once it starts press the info button on your remote control to bring up the Program Info.

This is how it currently looks on my laptop, you can only see part of the UNC Path and a Dolby Logo

Click here for larger image – Program Info

Click here for a larger image – Synopsis

Click here for a larger image – No Synopsis

If you see the same as the above screen shots, then you could be missing the My Movies Media Center MetaData Connector. A rather dated and I thought not a completely clear description of the MetaData Connector can be see here on the My Movies website.

To install the Metadata Connector browse to the following folder on your Windows Home Server

\\servername\Software\My Movies\Media Center MetaData Connector

In here you will find an exe called Media Center MetaData Connector.exe, probably best to close your Media Center program down before running the exe.

Note:- If your Windows client does not have the Windows Home Server Connector software already installed you will get this error:

After clicking the Create button you will see this dialog.

If you are using the My Movies client / MCE add-in then I would go for the first option. If you are using the native My DVD’s (MCE 2005) DVD Library (VMC) or Movies Library (7MC) only I think you would go for option two.

So I select Yes on this dialog as I will be using the My Movies client / MCE add-in on my Windows 7 PC’s.

After clicking the Yes button I was presented with this dialog box.

I then clicked OK on the above dialog and I was simply left with the first dialog box showing on the screen this one:

So at this point I was a little confused as to what was going on? Had the installation finished?

I then opened Media Center and opened My Movies Library and nothing had change I still had no metadata whilst playing a movie.  Looking on the My Movies forum it was suggested that selecting Yes does not work (Thanks Tony). So I tried again and this time selected No. I then saw the following dialog boxes.

Click Yes

Click OK

I then went back in to Media Center and My Movies and started playing the same film again, this time I had the metadata showing as you can see in the screen shots below.

Click here for a larger image

Click here for a larger image

Click here for a larger image

Click here for a larger image

Apparently there is also a problem with Windows Service Pack 1 that breaks this functionality, I do not know why of have any further details on this, perhaps Brian can enlighten us.


www.phaze1digital.com

Wednesday, 29 December 2010

New intro videos available on VIPID

Hello just a quick update, there are two new custom intro templates available on VIPID, one is a Warner Brothers one and the other is a Lucas Film one.

Click HERE to see a sample Warner Brothers custom intro clip

Please let me know if you have been using the VIPID service and what you think about it?

http://vipidme.com/

http://www.phaze1digital.com/

Friday, 17 December 2010

Control your Mouse cursor with your Logitech Harmony remote control

I saw an interesting post on The Green Button here that linked to another interesting post on the Logitech Harmony forums here. What was being discussed was two additional Microsoft Media Center devices that are listed in the Logitech Harmony device database, one is called “Special Edition” Windows Media Center which is a Media Center PC device that has an extended command set, the other device is an MCE Keyboard which maps all the keyboard keys and commands.

I wasn’t aware these two additional devices existed and when program Logitech Harmony remote controls for use with Windows Media Center PC’s in the past I’d used the standard Windows Media Center device from the Harmony database.

I recently purchased a second hand Logitech Harmony 555 as I really like this particular discontinued model and I’d used the 550 USA version of the same remote before in the past. The newer Windows Media Center SE device in the Harmony database has support for mouse cursor!

The new device can be added as follows:

Device type: Computer -> Media Center PC

Manufacturer: Microsoft

Model: Windows Media Center SE (Copy and paste in this device name in the Model field)

Add the new Windows Media Center SE device to your device list in the Harmony software

Click for larger image

The below instructions are from the Logitech Harmony forum post, I will go through each number below and add a few things as well.

Below you will find the instructions to create a mouse control activity.

1: Create a Generic activity only using the Windows Media Center device.

Answer Title: Adding an Activity that does not fit into any category in the Logitech Harmony Remote Software

Answer Link:

http://logitech-en-amr.custhelp.com/cgi-bin/logite​ch_en_amr.cfg/php/enduser/std_adp.php?p_faqid=121...

For the input select the following option

I don't need to set the input on my Microsoft Media Center PC

2: Program the activity to leave on the unused device.

Answer Title: Setting a Harmony remote to not power off devices when switching between Activities

Answer Link:

http://logitech-en-amr.custhelp.com/cgi-bin/logite​ch_en_amr.cfg/php/enduser/std_adp.php?p_faqid=123...

3: Rename the activity to Mouse Control

Answer Title: Renaming Devices and Activities on a Harmony remote

Answer Link:

http://logitech-en-amr.custhelp.com/cgi-bin/logite​ch_en_amr.cfg/php/enduser/std_adp.php?p_faqid=378...

4: Change the button mapping

Use the Map the Mouse Up,Down,Left<Right to the direction buttons.

Map the Mouse Left Up and Mouse Left Down to the Volume Up and down buttons.

Map the Mouse Right Up and Mouse Right Down to the Channel Up and down buttons.

Stuart’s instructions -

1. Add custom Activity

In the Harmony software go to the Activities tab and add a new Activity.

Select No - manually add an Activity to my setup and click on the Next button

Select the Activity category Utility and click on the Next button

Select Generic Activity and click on the Next button

Confirm that you would like to add a Generic Activity by clicking on the Next button

Choose the device(s) you would like to add by clicking on the Add button. When you have finished adding all of the devices, click on Save

I just added the Media Center PC device at this stage.

If you would like to have the Harmony remote set the device to an input when you select the Generic Activity, then choose the input for the device, otherwise select I don't need to set the input and click on the Next button.

Here I selected I don’t need to set the input on my Microsoft Media Center PC

Review the settings for the activity. If the settings are correct select Yes, these settings are correct and click the Next button

Complete the setup of the activity by clicking on Done

After adding a Generic Activity, when you select the Activity on your Harmony remote, none of the buttons will be programmed. You will need to customize the buttons in your Generic Activity. For more information on customizing the buttons on your Harmony remote, please search our knowledge base with the term "Customize buttons in an Activity"

Once completed, you will need to update your remote. Click on the Update Remote button and follow the onscreen steps

On this screen click Next and then Done

Your new Generic Activity will now be listed under the Activities tab in the Harmony Software, click the Settings button.

Select Rename Generic Activity and call it Mouse Cursor and save this change.

Go back to the Generic Activity settings and then select Change Options and select Leave On, save this change and click Done.

From here click Customize Buttons

In here you need to assign the mouse cursor commands to the various buttons as shown below.

Change the button mapping

Use the Map the Mouse Up,Down,Left<Right to the direction buttons.

Map the Mouse Left Up and Mouse Left Down to the Volume Up and down buttons.

Map the Mouse Right Up and Mouse Right Down to the Channel Up and down buttons.

Logitech’s instructions mention nothing about left and right mouse buttons! So on my 555 remote I assigned the Mute button as LeftClick and the Prev button as RightClick

That’s it your done!

Now you can select the Activity called Mouse Cursor and use the Harmony remote controls directional / volume / channels buttons to move the mouse cursor around the screen and if you also added left and right mouse buttons as I did you can select items and right click.

I am sure there is much more scope for other new customisations with these Windows Media Center SE and MCE Keyboard extended command sets.

www.phaze1digital.com

Thursday, 9 December 2010

My Movies for iPad - controlling My Movies for Windows Media Center

Brian Binnerup of My Movies has released a new YouTube video of My Movies for iPad in action controlling Windows Media Center.

I have to say the remote control looks very impressive indeed! You can control multiple Windows Media Center PC’s and 5 Windows Media Center Extenders per PC.

Watch the demo video:

My Movies for iPad–Control Media Center

Learn more about My Movies for iPad on the My Movies website here.


www.phaze1digital.com

Friday, 3 December 2010

Change the default windows audio device within MCE

I added a Denon CD Receiver (AMP) to one of my 7MC PC’s today to power some in-room speakers. I used the analogue stereo 3.5mm port on the back of the motherboard to the phono line in Left / Right ports on the back of the Denon amp.

I then needed a way to be able to change the default windows audio device from within the Media Center user interface, (Speakers) audio device for the Denon amp and (HDMI) audio device for the HDTV.

I tried to do this in the past using Vista Audio Changer but found it didn’t work 100% as it would minimize Media Center and then using a macro open the Playback audio devices dialog box and change the default audio device, it was hit and miss to say the least.

I then found a Windows Media Center add-in called Audio Renderer Updater on this page here. I installed it today on one of my 7MC PC’s and it works great, no minimizing of Media Center or any of that malarkey, it just switches the default windows audio device perfectly every time!

You can download the English version from here and the French version from here.


www.phaze1digital.com

Friday, 26 November 2010

WHS V2 Vail = Fail – Tell Microsoft your thoughts on them removing Drive Extender

You have probably heard by now that some bright sparks at Microsoft have decided that removing Drive Extender from Windows Home Server Version 2 (Codename Vail) is a good idea! Well its not and it will probably kill off the WHS platform in my opinion.

I was reading this post on the subject at http://usingwindowshomeserver.com and in the comments I noticed a link to a thread on the Microsoft Connect (Beta) website.

You will need a Connect account to access this page or you will get an error, but I highly suggest if you want to vote and express your comments to Microsoft this is probably the best place to do it. So please take the time to register and get on Connect if you can. You can find the thread on Connect here.

https://connect.microsoft.com/WindowsHomeServer/feedback/details/624029/add-drive-extender-back-to-vail

There are currently 2852 Votes in favour of keeping Drive Extender in Vail and 37 against. There are currently 775 comments that have been posted by users.

Click here for larger image

The comment I posted on the Microsoft Connect thread can be seen below and clearly expresses my disbelief in this announcement.

I am totally shocked and amazed that Microsoft would think that removing Drive Extender from WHS V2 would be a good idea. Duh which idiots make these decisions?
I just got the link to this Connect thread from this blog post here:
http://usingwindowshomeserver.com/2010/11/23/microsoft-announces-the-removal-of-drive-extender-from-windows-home-server-code-name-vail/
Microsoft please read the user comments on the above blog post and the many other blog posts on the Internet, where this news about Drive Extender being removed has been announced.
The comments left on this Microsoft Connect thread are only a tiny minority of users who have a Connect login account, there must be 1000's of others who also want to see that Drive Extender does remain in the WHS product, who can't post here.
I certainly won't be upgrading to WHS V2 if Drive Extender is removed and neither will our Media Center customers.
Sort it out Microsoft and get your act together !

Stuart aka CW-KID

Microsoft Windows Entertainment and Connected Home MVP

Thursday, 25 November 2010

VipID Custom Intro Videos – Now open for user registration

I previously wrote about a new beta website from VipID I was testing, which enabled you to easily create your own custom Home Theatre Into Videos, if you missed that post check it out here.

The news today is that the VipID beta website is now open for user registration, so if you fancy checking it out, head over to here and create yourself an account.

The VipID website addresses: www.vipid.me or www.vipidme.com

www.phaze1digital.com

Monday, 22 November 2010

Amulet Voice Remote Control – Part3

In part two I took a look at the Amulet Media Center add-in screens and eventually established that the voice commands not only work in these new areas, but also in the native parts of Media Center, for example I was also able to go in to the regular Windows 7 Media Center Music library and use voice commands like Play Artists (artist name) and Play Some (genre name). Being able to use most of the voice commands in the native parts of Media Center really makes this remote control more appealing.

I have also been using the Amulet voice remote control recently for my Media Center Live TV and it works very well, you can simply say: Go To TV Guide to launch the guide, then use commands like Watch Channel BBC1 or Watch Channel ITV1 etc to change channels which is pretty cool. You can also navigate around the TV guide using commands like Show Guide at (time) on (date) or Show Channel (channel name) at (time) on (date) etc. So for example you can use a voice command like: Show Channel BBC1 Tomorrow at 13:00

I have scanned the voice commands quick reference cards that came with the remote control in the box, so you can see a full list of voice commands that can be used with the Amulet remote control. This should give you a much better idea of what can be done using voice commands alone!

Amulet Quick Reference Cards (Voice Commands)

Click here for larger image

Click here for larger image

Click here for larger image

Click here for larger image


Amulet – TV Guide


Amulet - TV and Video


Amulet - Music


Amulet – General


You can see that the Amulet user interface add-in areas are well designed and nicely animated. I especially like the Pictures area and how the Polaroid like tiles move in to position as new photo folders are displayed on screen. The Music interface also has some animation with the cover flow in the top left hand side displaying random album covers, also how the albums appear in the right hand pane for the currently selected artist is nicely done. I did have some issues with high CPU usage whilst in the Amulet Music area during music playback, however disabling the playback time counter in the Amulet.ini file seemed to improve this issue greatly. Amulet are hopefully looking in to this problem.

The Amulet movies / videos area I found a little confusing initially as it displays your media files in a flat view, i.e. it does not keep the folder hierarchy / sub folders, it displays your video files all at the same level, which can mean quiet long lists of video files, however Amulet say that this type of view is better suited for speech. I am yet to add my shared movie folders on my WHS into the Amulet media indexer, I need to do this and it will be a good test of the system as I have over 1400 titles.

Navigating around the Media Center TV Guide using speach is great, once you get use to the correct voice commands. Just saying Watch Channel BBC1 and it changing to that channel is brilliant, you can use commands like Record That to record a program you currently have selected in the guide.

In part 4 I will be looking at using Amulet with my shared movie folders on the WHS and also taking a look at the Amulet.ini file and some of the things you can customise in there.

http://www.phaze1digital.com/

Thursday, 11 November 2010

Amulet Voice Remote Control – Part2

Update:

You can see Amulet in action on the Amulet YouTube Video channel here

It seems some of my assumptions about the need for the Amulet Media Center UI screens have been wrong. Eddy Carroll from Amulet has informed me that:

"While we do have our own Amulet UI screens, these are not required to access movies or videos using voice. We provide them as a convenience if you need reminding what items are in your collection (hence the fairly flat hierarchy), and to provide more onscreen feedback while you're getting used to the voice commands.

However, you can use commands like PLAY ARTIST, WATCH MOVIE, etc. from anywhere within Media Center, such as the traditional Music Library or Movie Library pages and they will work just as they would on the Amulet UI pages. In fact, pretty much all of the Amulet commands work independently of the Amulet UI screens (with a couple of small context-sensitive exceptions, such as SHOW EPISODE which depends on having previously said the name of a TV series to watch; in this case, the Amulet UI screens will be showing you the list of episodes to choose from)."

I didn't realise that more of the voice commands would also work in the native areas of Media Center as well, as I was so busy checking out the new Amulet user interface areas, so this is an important point that should be noted.

Original Post:

In part one I looked at the Amulet remote control hardware and software installation, in part two we are going to take a look at the Amulet’s Media Center add-in software. You can use the Voice Remote to navigate around the normal areas of Media Center like the movie, music, pictures and video libraries. You can use voice commands like Go To Start, Go To Movie Library, Go To My Music, Go To My Pictures, Go To My Videos. These commands will take you to the native areas of Media Center. You can then use voice commands such as Go Up, Go Down, Go Left, Go Right and Select or OK etc to navigate around. You can also say things like Go Up 1 Go Down 5 etc 1-9.

You can also edit the Amulet .ini file and add in custom voice commands for launching 3rd party Media Center add-ins like My Movies and TunerFree MCE. I tested adding custom commands for all my 3rd party add-ins and this works very well, so now for example I can say Go To My Movies and then My Movies is launched. You also get onscreen text feedback after you say a voice command and the computer voice speaks your command back to you e.g. it says “Launching My Movies” after I have used the Go To My Movies voice command. I believe you can also add custom commands to launch external programs and .cmd files etc which could be very handy.

This is all well and good but in order to say commands like Show Artists or Genres XYZ, Play Artist or Album XYZ, Play Song XYZ, Watch Channel XYZ, Play Movie XYZ etc Amulet needed to develop their own user interface within Media Center. After installing Amulet you will see a new Media Center menu strip. On here are the following icons:

Music / TV + Movies / Photos / Settings / Help Videos
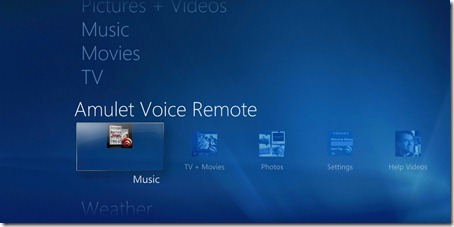
Amulet-UI1

To go to the special Amulet Music UI for example, you say the voice command: Go To Music, instead of Go To My Music which would take you to the native music library.

Music UI:

The Amulet Music UI is better than I had imagined, when I first saw videos of this remote in action at CES I wasn’t keen on the whole idea of replacing use of parts of the native 7MC UI with their own. However doing just that was probably the only way a voice system like this would work I think. On the screenshot below, the covers you can see on the top left are just random covers that are animated in a cover flow like style and move about. The middle pane is where the details are, e.g. you can see the artists / genres / albums. You can say Show Artists and it then lists all artists in a list in the middle of the screen. Or Show Genres etc, You can then use voice commands like Play Artist {artist name} Play Album {album name} Play Some {genre name} etc. I did find that my artists list was long 350 odd artists and scrolling up and down the list either using the directional buttons on the remote control or using navigation voice commands like Page Down was quiet slow going. It’s OK if you know which artist you want to play as you just say it, but if you want to browse the list and look at what’s available I found this a little more difficult.

If you say Show Artists Snow Patrol for example their albums are shown on the right hand side, these kind of sweep up from the bottom right of the screen when they appear, again sometimes I found the amount of time for the artist to appear after I had spoken my voice command to be quiet slow but then other times it would only take a few seconds to appear, this maybe an isolated issue with my setup however, as Amulet say artists are normally displayed within a few seconds.

I won’t say it detected the right artist name every time because it didn’t, some times I would say one name and it would come up with something completely different, was probably my Yorkshire accent it didn’t like, maybe you could improve this by training your PC more using the native speech recognition learning in Windows 7. But on the whole Amulet was fairly accurate.

You can use voice commands like Pause Song, Continue, Next / Previous Song, Fast Forward Song. One feature I really like is Info, this works in other areas as well but in music you can say stuff like: Name That Song, Who Sings That, What Song Is This? and the Amulet voice speaks and tells you, very cool indeed! You can also control the Media Center volume levels with commands like Quiet (mute), Medium Volume, Full Volume etc.
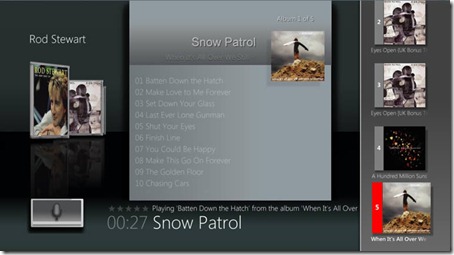
Amulet-UI0

TV + Movies UI:

You can use voice commands such as: Show Movies, Show Videos, Show TV Shows, Show Home Movies then you can use commands like Play Video XYZ, Play Movie XYZ etc. Amulet has its own background file scanner that index’s your media files. I haven’t fully figured out how it does this and how it knows to put a certain video file in to the correct category, they are using http://www.themoviedb.org/ for some of their metadata. I’ve had mixed results, it picked up all my Recorded TV correctly, some things were classed as Movies which I thought should not have been, it seemed to detect all my home videos off my camcorder / digital camera correctly and group them together. Initially only some of my downloaded TV shows were appearing in the TV Shows area, You can run the scanner manually from the start menu after doing this a few times more missing items started to appear.

The TV + Movies area of the Amulet UI is still the part I know the least about and I am still in the process of working stuff out, so I will not cover this anymore today, I may recover this area again in a future post when I have got to grips with it better.
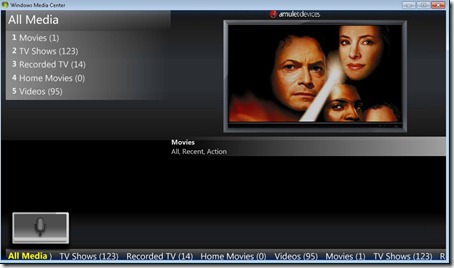
Amulet-UI2

Photos UI:

The Photos area is very nicely animated and easy to use, You just say Play SlideShow (name of folder) So for example I could say Play Slide Show Abigale’s 2nd Birthday and the folder of photos would start in a slideshow. I’ve also noticed you don’t always have to say the full name of an item you want to play, some times saying just the first or second word is enough for it to pick up the right thing, this is handy if you have something with a long name like a movie title you can just say the first part of it. There is a command to play all your photos in a Slideshow this is GO TO SlideShow, by default it looks in the C:\Users\Public\Pictures folder I had to edit the Amulet.ini file to point it to my main photos folder on my WHS. I like the photo functionality of Amulet its simple and easy to use and looks good!
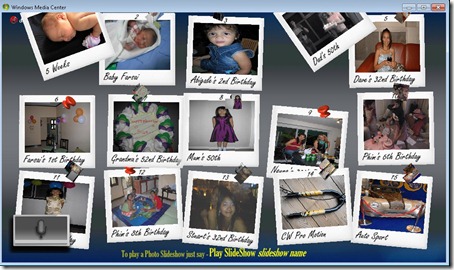
Amulet-UI3

Settings:

There are various settings you can change in the Amulet settings area, you can add a welcome message, so now every time Media Center is opened after a short wait it says “"Welcome Harrison Family”' I found this helpful as after I hear this I know Amulet is ready for voice commands, as it seems a little slow after you have launched Media Center until its ready to accept any commands. You can also change the voice from some bloke called Paul to Microsoft Anna, change volume settings and other Listener / Talker settings.
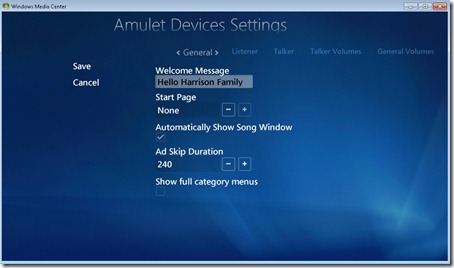
Amulet-UI4

Help Videos:

The Help Videos are useful and I was glad they were there!
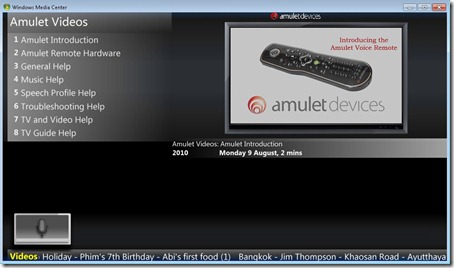
Amulet-UI5

Well I think that’s enough for part two, overall I am still very impressed with the Amulet voice remote control, there are some issues and kinks I need to iron out with how some of my video files are being indexed hopefully I can sort this out and talk in more detail about the Movies / Videos area of the Amulet UI.

I’m not sure yet what I will cover in Part 3, maybe more about the Movies / Videos area, or maybe I can talk about some of the custom configuration and editing this Amulet.ini file, I believe Amulet have plans to make adding custom commands and other things you need to edit in this .ini file, easier with a GUI maybe in Media Center itself.

The other thing I’ve not really looked at yet is how you can control Live TV with the remote, so I may look at this in part 3, so stay tuned, if anyone has any questions about it please feel free to leave a comment.

http://www.phaze1digital.com/